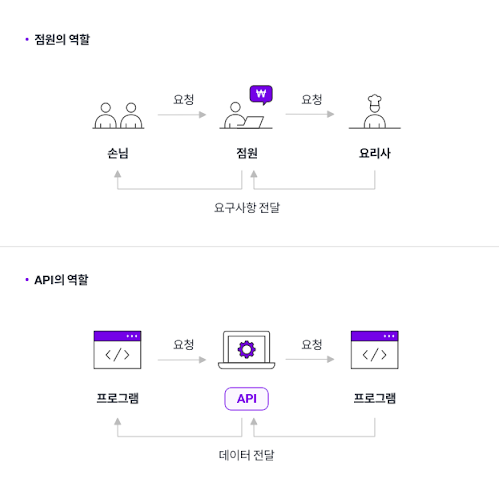
📝 REST API 란 ?
REST API : REST 기반으로 서비스 API(Application Interface) 를 구현한 것을 REST API 라고 한다.
[Flask] (2) REST & HTTP Method & API/End Point
📝 REST란 무엇인가 ? REST : Representational State Transfer = 자원을 이름(자원의 표현)으로 구분하여 해당 자원의 상태를 주고 받는 것을 의미한다. = 즉, 자원(resourece) 의 표현(representation)에 의한 "..
youngminieo1005.tistory.com
최근 OpenAPI (누구나 사용할 수 있도록 공개된 API), 마이크로 서비스 등을 제공하는 기업에서는 대부분 REST API를 제공한다.
💡 REST API 특징
- REST 기반으로 시스템을 분산하여 확장성과 재사용성을 높여 유지보수를 편리하게 할 수 있다.
- REST는 HTTP 표준을 기반으로 구현하고, HTTP를 지원하는 프로그램 언어로 클라이언트,서버를 구현할 수 있다.
따라서, REST API를 구현하면, 클라이언트 뿐만 아니라, JAVA, C#, WEB 등을 이용해서 클라이언트를 제작할 수 있다.
💡 REST API 규칙
REST에서 가장 중요한 기본적인 규칙은 두 가지이다.
URI는 자원을 표현하는 데 집중학, 행위에 대한 정의는 HTTP Method를 통해 하는 것이 REST API를 설계하는 핵심이다.
1. URI는 정보의 자원을 표현해야 한다.
- 리소스명은 동사보다는 명사를 사용한다.
- URI는 자원을 표현하는 데에 중점을 두어야한다.
- GET같은 행위에 대한 표현이 들어가서는 안된다.
#안 좋은 예시
GET /getTodos/3
GET /todos/show/3
#좋은 예시
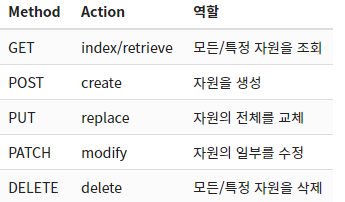
GET /todos/32. 자원에 대한 행위는 HTTP Method(GET, POST, PUT, DELETE 등)으로 표현한다.
주로 5가지의 Method(GET, POST, PUT, DELETE , PATCH)를 사용해서 CRUD를 구현한다.
#안 좋은 예시
GET /todos/delete/3

#좋은 예시
DELETE /todos/3
📝 RESTful 이란 ?
- RESTful은 일반적으로 REST라는 아키텍처를 구현하는 웹 서비스를 나타내기 위해 사용되는 용어이다.
- 따라서 REST API를 사용하는 웹 서비스를 우리는 "RESTful하다"고 할 수 있다.
- RESTful은 REST를 REST답게 쓰기 위한 방법으로 누군가가 공식적으로 발표한 것이 아니다.
- REST의 원리를 따르고 사용하는 시스템을 RESTful이라는 용어로 칭하게 된다.
💡 RESTful의 목적은 무엇인가 ?
이해하기 쉽고 쉬운 REST API를 만드는 것이다.
- RESTful한 API를 구현하는 근본적인 목적이 성능 향상이 중점이 아니다.
- API의 이해도와 호환성을 높이는 것이 주된 목적이다.
- 따라서, 성능이 중요한 상황에서는 굳이 RESTful한 API를 구현할 필요가 없다.
📝 REST API 설계 기본 규칙
1. URI는 정보의 자원을 표현해야 한다.
- 자원은 동사보다는 명사를 사용
- 자원은 대문자보다는 소문자 사용
- 자원의 도큐먼트 이름으로는 단수 명사를 사용
- 자원의 컬렉션 이름으로는 복수 명사를 사용
- 자원의 스토어 이름으로는 복수 명사를 사용
#안 좋은 예시
GET /Student/3

#좋은 예시
GET /students/3		# 소문자,복수명사 사용
2. 자원에 대한 행위는 HTTP Method(GET, POST, PUT, DELETE 등)로 표현한다.
- URI에 HTTP Method가 들어가면 안된다.
#안 좋은 예시
GET /students/delete/3

#좋은 예시
DELETE /students/3
- CRUD 기능을 나타내는 것은 URI에 사용하지 않는다.
#안 좋은 예시
GET /students/show/3
GET /students/insert/4

#좋은 예시
GET /students/3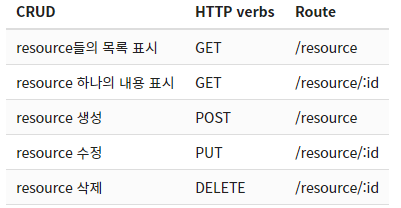
POST /students/4- : id 는 하나의 특정 자원을 나타내는 고유값이다.
ex) student를 생성하는 route : POST/students
ex) id=12인 student를 삭제하는 route: DELETE/students/12
🔊 용어
- 도규먼트 : 객체 인스턴스나 데이터베이스 레코드와 유사한 개념
- 컬렉션 : 서버에서 관리하는 디렉터리라는 자원
- 스토어 : 클라이언트에서 관리하는 자원 저장소
📝 REST API 설계 규칙
1. 슬래시 (/) 는 계층 관계를 나타내는 데 사용한다.
ex) https://academy.elice.io/classroom/teach
2. URI 마지막 문자로 슬래시 (/) 를 포함하지 않는다.
ex) https://academy.elice.io/classroom/teach/ ← ( X )
- URI에 포함되는 모든 글자는 자원의 유일한 식별자로 사용되야 한다.
- URI가 다르다는 것은 불러오는 자원이 다르다는 뜻이고, 반대로 자원이 다르면 URI도 달라져야 한다.
- REST API는 분명한 URI를 만들어 통신을 해야 하기 때문에 혼동을 주지 않도록 URI 경로의 마지막에는
슬래시 (/) 를 사용하지 않는다.
3. 하이픈 (-) 은 URI 가독성을 높이는데 사용한다.
4. 밑줄 ( _ ) 은 URI에 사용하지 않는다.
5. URI 경로에는 소문자를 사용한다.
6. 파일확장자는 URI에 포함하지 않는다.
ex) https://academy.elice.io/classroom/teach/111/python.png ← ( X )
ex) GET / classroom/teach/111/python HTTP/1.1 Host: academy.elice.io Accept: image/png ← ( O )
7. 자원 간에 연관 관계가 있는 경우 다음과 같이 작성한다.
/자원명/자원ID/관계가 있는 다른 자원명
ex) GET : /students/{studentid}/classroom
📝 REST API : CRUD 구현해보기
앞선 포스팅 ( Flask 1~ 6 )을 보면, render_template( ) 메소드를 이용해서, html에 출력 결과를 띄워 값들을 확인했었다.그리고 html에서는 jinja2 문법으로 해당 내용을 받아서 html에 띄울 수 있었다.
하지만, 이는 "API 서버"를 개발한 것이 아닌, Flask를 활용해서 "웹 어플리케이션"을 개발한 것이다.
REST API 서버를 개발 할 때는, 서버단에서 직접 렌더링(Rendering)해서 페이지를 보여주는 것이 아니라
웹 페이지를 구성하는데 필요한 "정보를 반환" 해주도록 구현해야 한다.
따라서, 백엔드 서버는 클라이언트(프론트 엔드) 와 데이터를 주고 받음으로써 통신을 하게 되는 것이다.
🔊 웹 상에서 가장 많이 쓰이는 데이터 형식은 JSON 형식의 데이터를 주고 받는다.
🔊 [Tips] REST API를 위해 구현되는 CRUD의 메소드와 URL의 이름은 CRUD에 맞추는 것이 일반적이다.
from flask import Flask, render_template, request, redirect, url_for
import json
app = Flask(__name__)
board = [] # 실제 DB가 아닌, 예제를 위한 board 리스트
# root 경로
@app.route('/')
def index():
return render_template("Boards.html", rows = board)
# POST : CREATE (C)
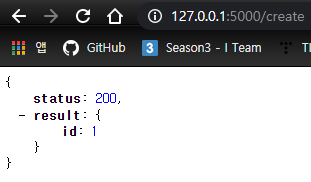
@app.route("/create", methods=["POST"])
def create():
name = request.form["name"]
context = request.form["context"]
board.append([name,context])
return json.dumps( { "status":200, "result" : { "id" : len(board)} } ) # json.dumps({ HTTP 상태, 반환할 결과 }) = 데이터를 json 형태로 변환해준다.
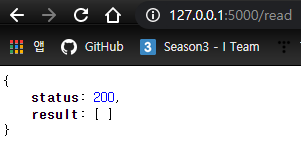
# GET : READ (R)
@app.route("/read", methods=["GET"])
def read():
return json.dumps({"status":200, "result":board})
if __name__ == '__main__':
app.run()<!-- ./templates/Boards.html -->
<!doctype html>
<html lang="ko">
<head>
<meta charset="UTF-8">
<meta name="Generator" content="EditPlus®">
<meta name="Author" content="">
<meta name="Keywords" content="">
<meta name="Description" content="">
<title>게시판 등록</title>
<style type="text/css">
body{ text-align: center; }
</style>
</head>
<body>
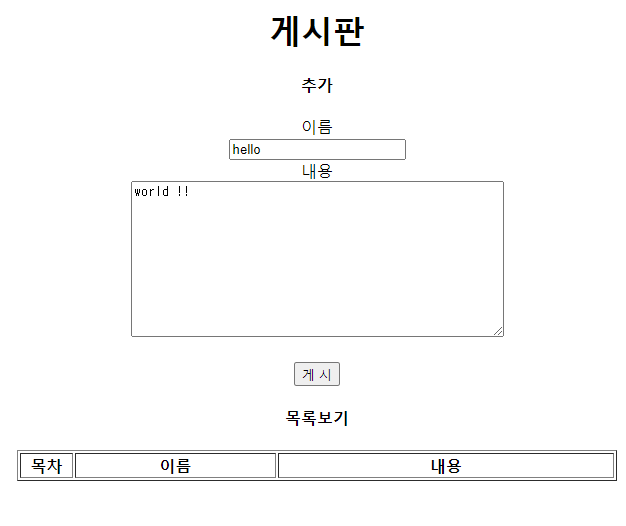
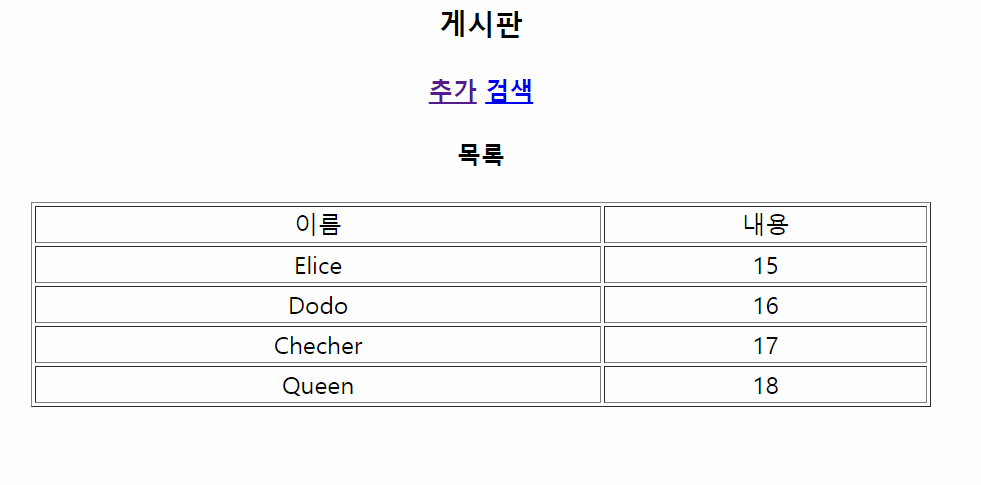
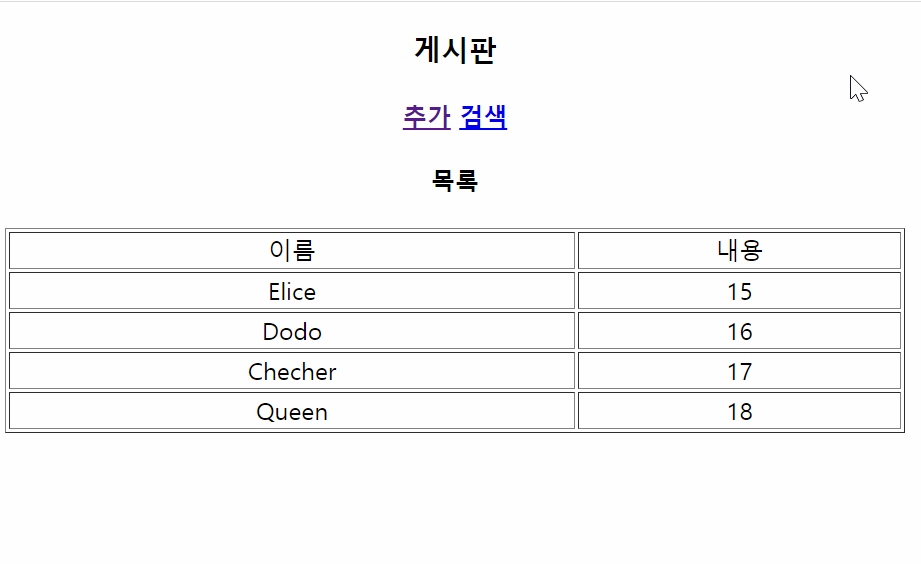
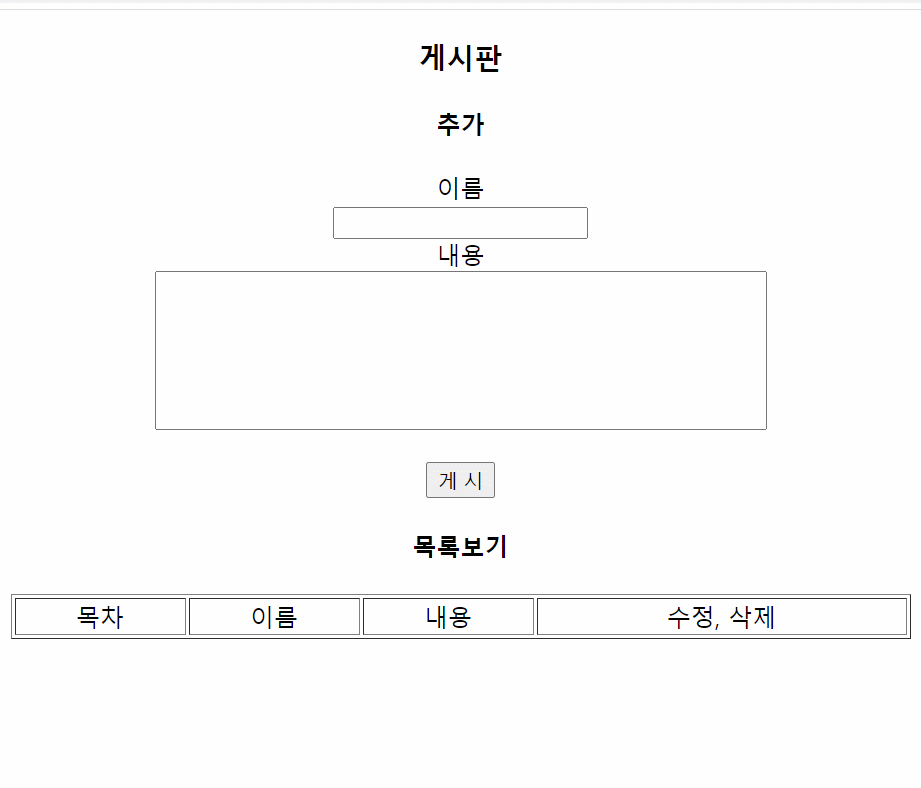
<h1>게시판</h1>
<h4>추가</h4>
<form action = "/create" method = "POST">
이름<br>
<input type = "text" name = "name" /><br>
내용<br>
<textarea name = "context" cols="50" rows="10"></textarea><br><br>
<input type = "submit" value = "게 시" /><br>
</form>
<h4>목록보기</h4>
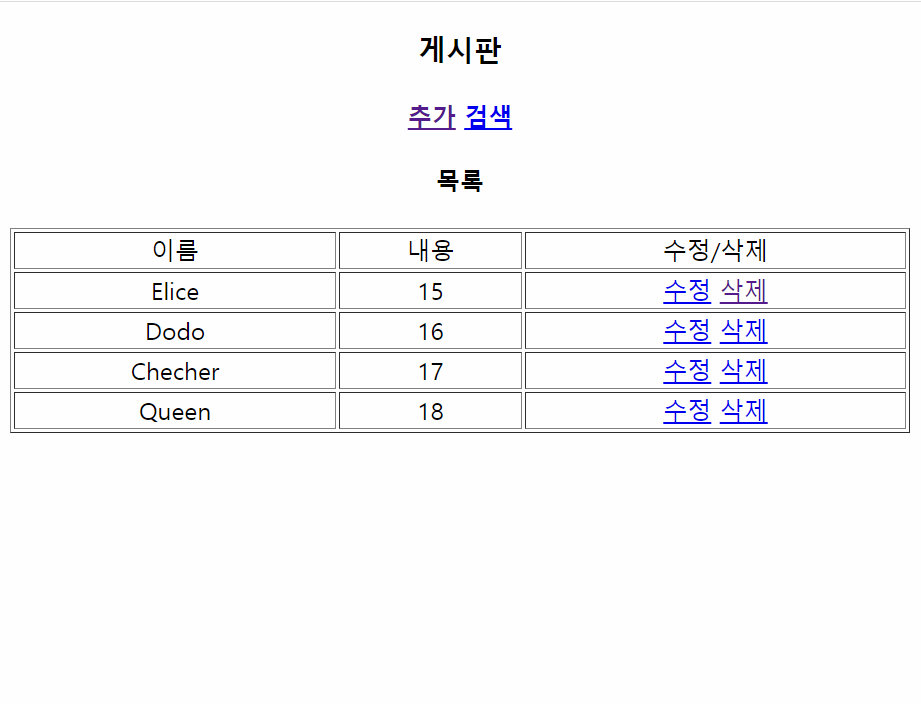
<table class="table" border="1" width = 600 style = "word-break:break-all" style="table-layout: fixed" align="center">
<thread>
<th width="4%">목차</th>
<th width="15%">이름</th>
<th width="25%">내용</th>
</thread>
{% for row in rows %}
<tr>
<td>{{ loop.index }}</td>
<td>{{ row[0] }}</td>
<td>{{ row[1] }}</td>
</tr>
{% endfor %}
</table>
</body>
</html>💡 CREATE : POST
💡 READ : GET
📌 UPDATE(PUT)와 DELETE(DLEDTE)는 앞선, CREATE(POST), READ(GET)과 달리, Ajax를 이용해서 구현되기도 한다.
📝 Ajax : 비동기식(Asynchronous) JavaScript + XML 이다.
Ajax 는 REST API를 손쉽게 구현하기 위해 사용되는 "프레임워크"이며, html 파일에서 간단히 사용하는 방법을 해보자.
( 이번에는, html 파일을 더, 주의깊게 보자. ( Ajax 부분 ) )
# Ajax_Example.py

from flask import Flask, render_template, request, jsonify  # Flask의 내장된 jsonify = json.dump() 와 같은 기능이다. json 형태로 데이터 반환

app = Flask(__name__)

board = []  # 임시 DB 개념 (사실,리스트)

# root
@app.route("/")
def index():
    return render_template("ajax_index.html", rows=board)

@app.route("/ajax", methods=["POST"])
def ajax():
    data = request.get_json()   # request.get_json() = POST 요청을 통해 얻은 데이터 -> json 형식으로 얻기 위한 메소드
    board.append(data)

    return jsonify(result="success", result2=data)  # json_dumps({}) 와 기능은 같다.

if __name__ == '__main__':
    app.run()
<!--ajax_index.html-->
<html>
<head>
<script src="https://code.jquery.com/jquery-latest.min.js"></script>
</head>
<body>
<p id="example">AJAX</p>
<input type="text" id="id1" placeholder="id">
<input type="text" id="name1" placeholder="name">
<input type="text" id="context1" placeholder="context">
<input type="button" id="execute" value="execute">
<script>
$('#execute').click(function () {
var id = $('#id1').val();
var name = $('#name1').val();
var context = $('#context1').val();
var postdata = {
'id': id, 'name': name, 'context': context
}
// ajax 형식으로 -> ajax example.py로 데이터 전송
$.ajax({
type: 'POST',
url: '{{url_for("ajax")}}',
data: JSON.stringify(postdata), // 서버로 데이터를 넘길때는, JSON.stringify(데이터)로 String형식으로 넘겨준다.
dataType: 'JSON',
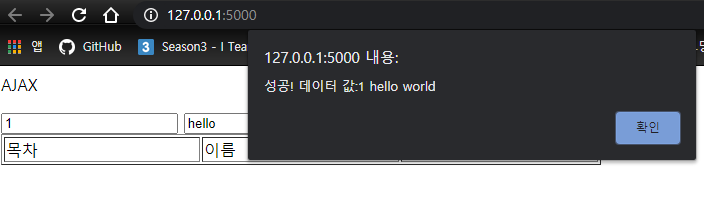
contentType: "application/json",
success: function (data) {
alert('성공! 데이터 값:' + data.result2['id'] + " " + data.result2['name'] + " " + data.result2['context'])
},
error: function (request, status, error) {
alert('ajax 통신 실패')
alert(error);
}
})
})
</script>
<table border=1 width="600">
<thead>
<td>목차</td>
<td>이름</td>
<td>내용</td>
</thead>
{% for row in rows %}
<tr>
<td>{{ loop.index }}</td>
<td>{{ row['name'] }}</td>
<td>{{ row['context'] }}</td>
</tr>
{% endfor %}
</table>
</body>
</html>
💡 UPDATE & DELETE ( PUT & DELETE )
from flask import Flask, render_template, jsonify, request

app = Flask(__name__)

board = [{"id": 1, "name": "elice", "context": "test"}]

@app.route('/')
def index():
    return render_template('index.html', rows = board)

@app.route('/create', methods=['POST'])
def create():
    data = request.get_json()
    board.append(data)
    return jsonify(result = "success", result2= data)


@app.route('/delete', methods=['POST'])
def delete():
    del board[-1]

    return jsonify(result="success")


@app.route('/put', methods=['POST'])
def put():

    data = request.get_json()
    board.append(data)

    return jsonify(result="success",result2=data)
<!--index.html-->
<html>
<head>
<script src="https://code.jquery.com/jquery-latest.min.js"></script>
</head>
<body>
<p id="example">AJAX</p>
<input type="text" id="id1" placeholder="id">
<input type="text" id="name1" placeholder="name">
<input type="text" id="context1" placeholder="context">
<input type="button" id="create" value="create">
<input type="button" id="update" value="update">
<input type="button" id="delete" value="delete">
<script>
// POST (CREATE)
$('#create').click(function(){
var id = $('#id1').val();
var name = $('#name1').val();
var context = $('#context1').val();
var postdata = {
'id':id, 'name':name, 'context':context
}
$.ajax({
type: 'POST',
url: '{{url_for("create")}}',
data: JSON.stringify(postdata),
dataType : 'JSON',
contentType: "application/json",
success: function(data){
alert('성공! 데이터 값:' + data.result2['id']+" " + data.result2['name']+ " " + data.result2['context'])
},
error: function(request, status, error){
alert('ajax 통신 실패')
alert(error);
}
})
})
// PUT (UPDATE)
$('#update').click(function(){
var id = $('#id1').val();
var name = $('#name1').val();
var context = $('#context1').val();
var postdata = {
'id':id, 'name':name, 'context':context
}
$.ajax({
type: 'POST',
url: '{{url_for("put")}}',
data: JSON.stringify(postdata),
dataType : 'JSON',
contentType: "application/json",
success: function(data){
alert('성공! 수정된 데이터 값:' + data.result2['id']+" " + data.result2['name']+ " " + data.result2['context'])
},
error: function(request, status, error){
alert('ajax 통신 실패')
alert(error);
}
})
})
// DELETE (DELETE)
$('#delete').click(function(){
$.ajax({
type: 'POST',
url: '{{url_for("delete")}}',
contentType: "application/json",
success: function(){
alert('성공! 데이터 삭제 완료')
},
error: function(request, status, error){
alert('ajax 통신 실패')
alert(error);
}
})
})
</script>
<table border=1 width="600">
<thead>
<td>목차</td>
<td>이름</td>
<td>내용</td>
</thead>
{% for row in rows %}
<tr>
<td>{{ loop.index }}</td>
<td>{{ row['name'] }}</td>
<td>{{ row['context'] }}</td>
</tr>
{% endfor %}
</table>
</body>
</html>
'python' 카테고리의 다른 글
| [Flask] (6) ORM & SQLAlchemy (0) | 2021.01.28 |
|---|---|
| [Flask] (5) RDB - Flask Connection & 게시판 예제 (0) | 2021.01.25 |
| [Flask] (4) 인증 & 로그인구현 & 로깅 (0) | 2021.01.25 |
| [Flask] (3) 렌더링 템플릿 & Jinja2 & 간단한 게시판 (0) | 2021.01.24 |
| [Flask] (2) REST & HTTP Method & API/End Point (0) | 2021.01.22 |


